It’s time for week 3 of my ‘Healthy Body’ Pilates series, where over the course of 6 weeks, I’ll be sharing just a few amazing ways in which Pilates can help to enhance your body!
So we’ve already looked at how Pilates can help improve back pain and posture, but this week I wanted to look at how Pilates can also help you internally. It’s time to look at digestion & gut health!
Digestive issues and gut dysbiosis (an imbalance resulting in more of the ‘bad’ bacteria in the gut, rather than the ‘good’) are unfortunately something I see all too often within my practice and gut issues affect many of us from bloating and digestive discomfort, to IBS and food sensitivities and so much more. Some of which can be life debilitating.
When our gut microbiome (the microflora that live within our digestive tract including bacteria, fungi etc.) is happy and humming along harmoniously and in balance, our food is digested, assimilated and absorbed more efficiently by the body. This not only affects the way in which food is digested and used throughout the body but it can also affect the overall wellness of our bodies including our mental health.
Did you know that around 95% of serotonin (the ‘happy’ hormone) can be found in our gut? Amazing right? So it’s time we started prioritising our gut health to help enhance our overall health and wellbeing.
Gut health & associated gut imbalances may take weeks, months or even years to rectify – you may even need the guidance of a health coach, nutritionist or medical professional to get you there – BUT guess what? There are a few Yoga poses that can help relieve some of that discomfort and encourage your digestive system to tick along that little bit smoother!
The way that our food is digested has a huge impact on our digestive and gut health. But it’s not only how we digest our food that influences our digestive system, but also what we choose to put into our bodies, how we eat, when we eat, our mental state and even how we move our bodies.
This doesn’t mean you have to become vegan, supplementing with all the probiotics or overhauling your entire life over night – after all, there’s no one size fits all way of eating or living.
To help improve and enhance our health, in all areas, it’s more important to take small baby steps over a longer period of time to create more sustainable and loving life changes to really reap the benefits.
Ok, beautiful, so let’s explore how Pilates can help improve digestive discomfort and gut health.
Here are 5 Pilates exercises for you to enjoy and remember that practicing daily loving movement can help to improve gut health too!
I’ve included how many repetitions I’d recommend, however be mindful of your body and tailor these exercises to suit you.
It’s also important to remember that everybody is unique and therefore the way these exercises are performed may need to be tailored to the individual. These step-by-step guidelines are there as a general ‘guide’ and if you require further information or help then please do not hesitate to get in touch.
HELPFUL REMINDERS:
- Think about creating balance within the body by keeping your pelvis level and your hips and shoulders even.
- Draw your shoulders down your back and away from your ears (shoulder stabilisation).
- Working the core also includes working the muscles in the back. Don’t forget core engagement with these exercises as the front and back of your body work together in strengthening that powerhouse of muscles!
*Remember to listen to your body and move in a loving way for you. By taking part in this exercise program, you are acknowledging that you are fit, well and healthy to do so and understand that you are performing the exercises at your own risk. Always consult your physician if you’re unsure or if you’re struggling with chronic back pain. And if you’d like to find out more information on how Pilates can help you and your body, then let’s have a chat!
**I have also filmed a YouTube Pilates flow showing you how you can sequence these exercises together which you can find either by clicking here, or by heading to the bottom of this article.
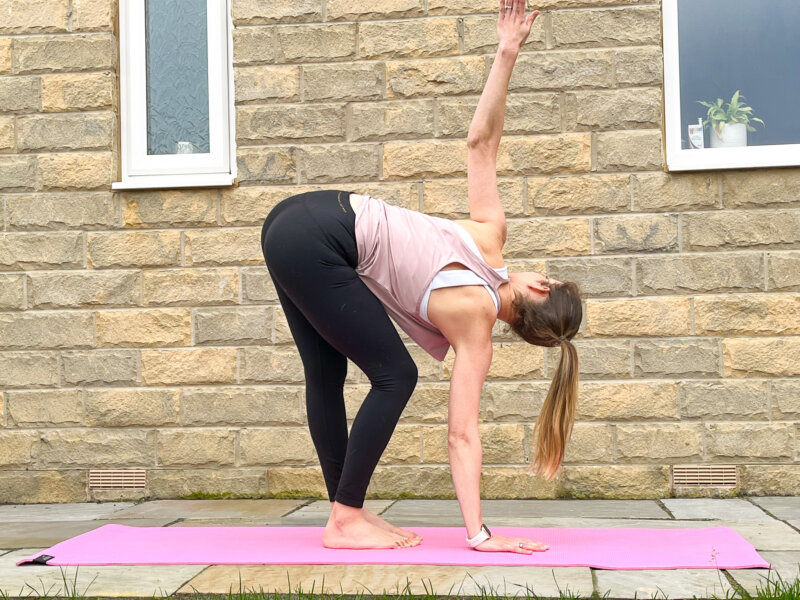
ROLL DOWN SPINAL TWISTS
6 Repetitions on each side
Helps improve flexibility of the posterior chain and spine mobility.
- Start by standing, feet hip width and finding your neutral spine, lifting the crown of the head towards the ceiling and shoulders drawing down your back.
- Soften through your knees and on the exhale begin to roll down through the spine, hinging from the hips into a Deep Forward Fold. Focus on lengthening through the spine and soften through your knees, allowing the crown of your head to draw towards the mat.
- Release your hands down to the mat. You may choose to use a Yoga block here to help find that connection to the mat.
- Plant your left hand down on the mat, bending through your left knee. On the exhale, reach your right arm up towards the ceiling, twisting through your spine. Maintain the length in the spine to help facilitate the twist.
- Inhale to lower the arm back down and repeat on the other side.
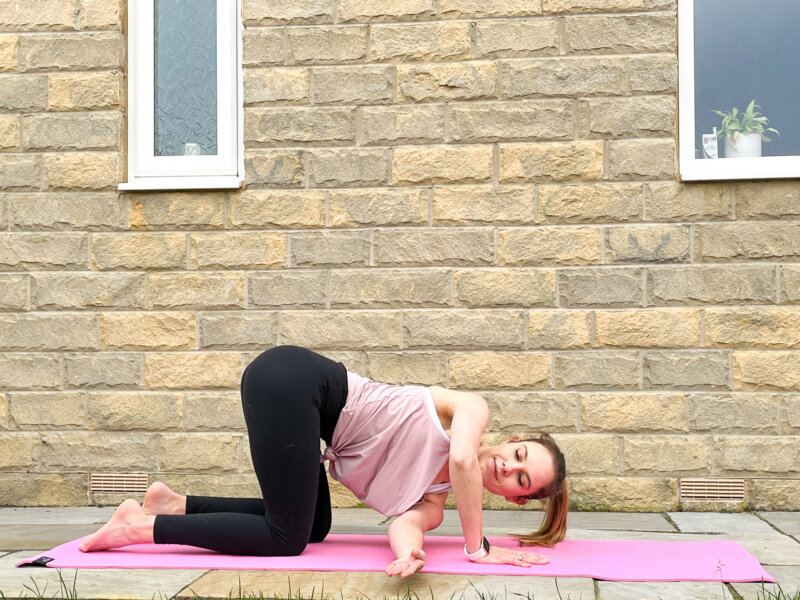
THREAD THE NEEDLE
5 Repetitions on each side
Helps improve spinal mobility through spinal rotation, releases tension in the upper body and strengthens the upper body. Helps to also massage the internal organs.
- Start on all fours in a box position with hands directly underneath the shoulders and knees underneath the hips, hip width apart.
- Engage your core, maintaining neutral spine with the crown of your head drawing out in front of you (gazing down towards the mat) and your shoulders soft and down the upper back.
- Inhale as you sweep your right arm up towards the sky, rotating through the spine. You may choose follow your hand with your gaze if this feels comfortable.
- On the exhale, start to thread that right arm underneath the left side of the body, hovering your shoulder just about the mat.
- Inhale to sweep the arm back up and repeat.
- You may choose to practice this exercise flowing with your breath, or you may choose to practice a static stretch by releasing your right cheek and shoulder down onto the mat.
- Repeat for the desired number of repetitions and then perform the same sequence on the other side.
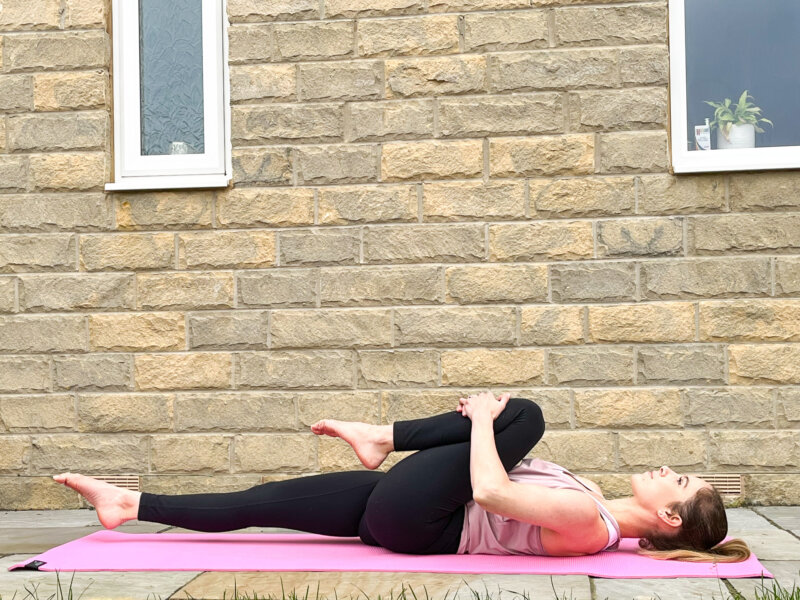
KNEES TO SIDE
8 Repetitions on each side
Helps improve core strength & stability, pelvic stability, pelvic floor strength and works the obliques. Twisting the body can also help to massage the internal organs.
- Start lying supine on the mat (on your back), with your knees bent and feet on the mat, keeping both the knees and feet together.
- Relax your shoulders, drawing them down your back and rest your arms by the sides of your body.
- Find neutral pelvis and maintain neutral spine throughout.
- Engage your imprinting (drawing your ribcage down towards your hips) to fire up that powerhouse and engage your pelvic floor.
- Inhale to prepare and as you exhale, slowly and with control, lower your knees over to the right, being mindful to keep you pelvis level and avoid peeling the left hip away from the mat.
- Inhale to draw the legs back to centre and then repeat on the other side.
- OPTION: Keep the feet on the mat, or bring both legs into table top, with the knees stacked over the hips and a 90 degree bend in the knees. Focus on keeping the pelvis level and watch that the opposite hip doesn’t lift away from the mat as the legs lower to one side. You might find that with both legs in table top you have a smaller range of movement available whilst keeping the pelvis level – this is normal. Remember to listen to your body and always move with intent and control.
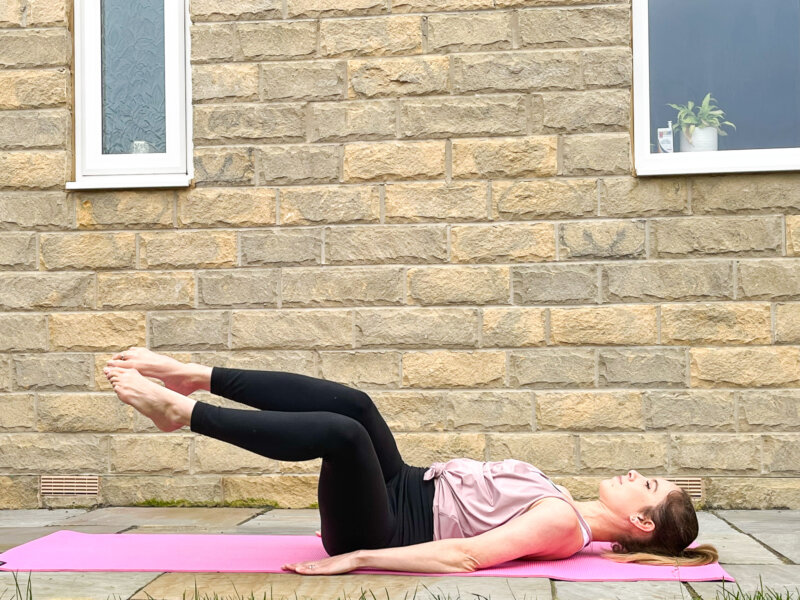
BICYCLE VARIATION (ALTERNATING KNEE TO CHEST)
8 Repetitions on each side
Helps improve core strength & stability and pelvic stability. Drawing the knees in towards the chest can also help to massage the internal organs.
- Start lying supine on the mat (on your back), with your knees bent and feet on the mat, keeping both the knees and feet hip width apart.
- Relax your shoulders, drawing them down your back and rest your arms by the sides of your body.
- Find neutral pelvis and maintain neutral spine throughout.
- Engage your imprinting (drawing your ribcage down towards your hips) to fire up that powerhouse and engage your pelvic floor.
- On the exhale, hug your right knee in towards your chest keeping your left leg elongated on the mat. Watch that your pelvis doesn’t tilt underneath you and elongate your spine on the mat.
- Inhale to hold and on the exhale switch your legs by lengthening through the right leg and hugging the left knee in towards the chest.
- Layer 1: Lower the extended leg to the mat.
- Layer 2: Hover the extended leg above the mat.
- Always keep your core engaged and your imprinting switched on so that your lower back doesn’t lift away from the mat.

BRIDGE (HIP DIPS)
12 Repetitions
Helps to mobilise and strengthen the spine, open up through the front facial line of the body, strengthens the glutes and lower back and improves pelvic stability.
- Start by lying supine on the mat (on your back), with your knees bent and feet on the mat. Walk your heels in towards your bottom (ideally, when in Bridge, we want the feet to be directly under the knees). Keep the feet and knees hip width.
- Draw your shoulders down your back and rest your arms by the sides of your body.
- Inhale to prepare and as you exhale, tuck your pelvis underneath you and start to lift your hips away from the mat one vertebrae at a time until you’re in a ski-slope position. There should be a direct line of energy from your knees, to your hips, to your shoulders.
- Squeeze your glutes at the top here to help protect and strengthen your lower back.
- Inhale at the top and as you exhale lower the hips a couple of inches. Inhale to lift the hips back up to the top. Continue with this flow for the desired number of repetitions.
- Move slowly, with intent and control as the main objective and focus on moving with your breath.
Want to learn more about how Pilates can benefit your body?
Why not check these out:
- Online on demand Pilates classes (Practice Pilates with me anywhere, at any time – as long as you have access to internet!)
- My online Pilates Library (A library of a variety of 15 minute workouts so you can tailor your workout to suit your goal, ability and time-frame)
- New to Pilates? Try my 6 Week Beginners Pilates Course (Can be accessed at your own pace)
If you’re brand new to Pilates, having been meaning to try it for a while, establish a more regular Pilates practice, pick it back up after having a few years off, or simply want to learn more, then I’ve created an online course just for you! My 6 Week Beginner Pilates Course is completely online with 6 on demand classes and can be accessed at your own pace. You’ll not only learn the history of Pilates and how it can benefit your body and mind, but also refine your technique and learn how to Practice Pilates safely. How amazing does that sound? Check out my 6 Week Beginners Course here.
Over the course of 6 weeks, I want to share just a few ways in which Pilates can help support and enhance the physical wellbeing of your body so that you can feel more energised, vibrant and full of life – Yes, Pilates is an incredible form of strength training but it’s also a powerful method of mindfulness, meditation and relaxation.Catch up here:
- Week 1: Pilates For Back Pain
- Week 2: Pilates For Better Posture
Mindfulness Coaching
DITCH YOUR INNER MEAN GIRL, RELEASE THE OVERWHELM AND LET GO OF STRESS. MINDFULNESS COACHING CAN HELP YOU CONNECT...